Request a Portable Loading Dock Quote
Interested in our portable loading docks and want more info? Let us know below and we will get back to you with more details. Dealer pricing available.
Watch our yard ramp in action!

The Copperloy portable loading dock shown with a yard ramp and two platforms.
Portable Loading Dock For Improved Loading
Copperloy has built a solid reputation for crafting top-tier yard ramps engineered to boost efficiency and safety in material handling tasks. Complementing these ramps are portable loading docks, forming an ideal pairing for streamlined loading onto carriers or docks, particularly in confined spaces or where permanent facilities are lacking. These versatile loading platforms are exclusively available in steel, ensuring robustness and reliability.
Features of Portable Loading Docks:
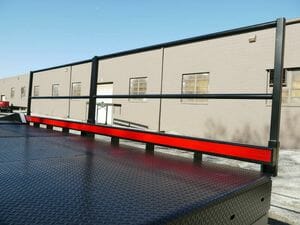
Platform Curbs
Utilize 7-inch safety curbs on portable loading docks to prevent inadvertent runoff. With an exclusive hollow section design and proprietary construction, these curbs effectively withstand the pressure of heavy loads and the additional strain from cargo breakout.
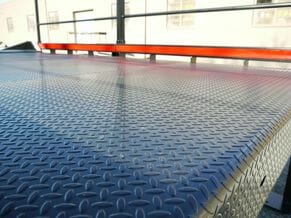
Steel Tread Plate Decking
Copperloy’s portable loading docks feature electro-forged serrated steel construction, providing exceptional strength. With grating bearing bars measuring 1-3/4 inches thick, these docks are engineered for enhanced durability in demanding environments. The bars are strategically spaced 1 inch apart to prevent debris buildup. This ensures a reliable, high-traction running surface in all weather conditions.
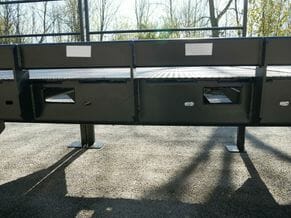
Lift Sleeves
Facilitating portability requires convenient mobility solutions! Lift sleeves are included to simplify the handling and repositioning of platforms using a forklift.
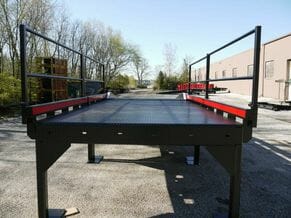
Portable Steel Platforms
Available in capacities of up to 30,000 pounds and lengths extending up to 12 feet, our steel platforms offer robust support. While these platforms are heavier and necessitate a forklift for movement, they boast higher weight capacities. For specific details on portable steel platform specifications, please reach out to the factory.
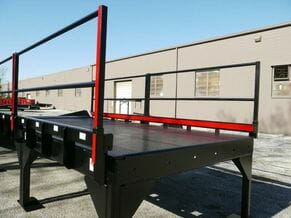
Handrail Option
Handrails can be customized and added to any platform to meet your specific length requirements. Our 42-inch high split handrails are constructed entirely of steel for durability and safety.
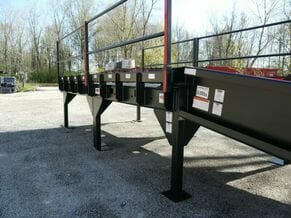
Custom Platform Options
Benefiting from an in-house engineering team, Copperloy delivers personalized temporary platforms designed to address any distinct challenge or specification you may have.
Yard Ramp Safety Features:
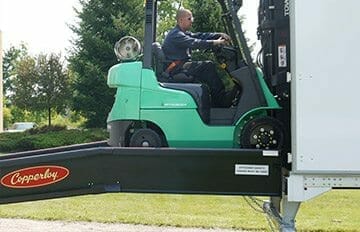
8ft level-off for trucks to safely enter and exit the trailer.
The Copperloy mobile yard ramp has an 8-foot level off feature. This is necessary for forklifts to have easy access onto trucks, loading docks, and platforms. It allows the fork truck to safely enter the trailer at a level approach and without having to stop. This feature makes for a very stable yard ramp and is especially useful on mobile ramps.
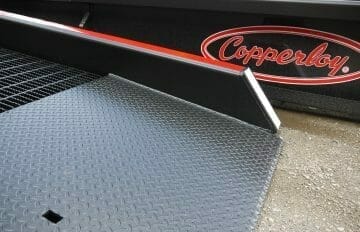
7″ safety curbs along the length of the yard ramp.
7-inch high curbs are standard on all Copperloy ramps to help prevent accidental runoff with a patented box frame.
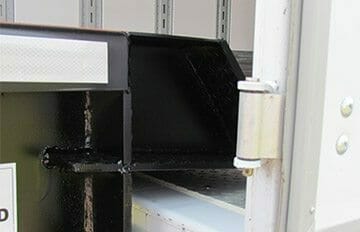
15″ lip designed to firmly rest the ramp on semi-truck container or platform.
The 15-inch lip is designed to firmly rest on the truck carrier body, dock floor or platform. Our mobile ramps come equipped with eight-foot-long safety chains. Chains join the ramp to keep it from pulling away.
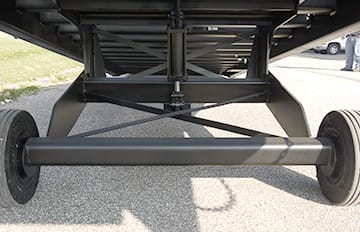
Increased stability with a central, one-cylinder design.
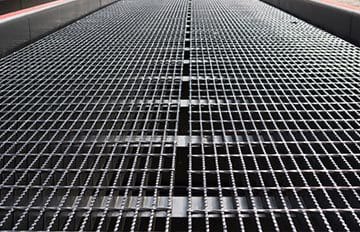
Increased durability with high-strength steel safety grating.
High-strength steel deck grating is standard on all Copperloy yard ramps. Grating bars are constructed for durability in the roughest of applications. The 1-3/4 inch bar depth allows snow, rain, and other debris to fall through. The serrated grating helps to ensure an all-weather, high-traction running surface.
Yard Ramp Efficiency Features:

Fastest raise and lower speed with single hydraulic pump design.
The single-acting hydraulic hand pump design requires half the effort needed to raise ramp compared to other mobile ramps. The pump is relocated so that it is protected away from dirt, debris, damage and makes maintenance easier to perform. The handle is stored out of the way when not in use.
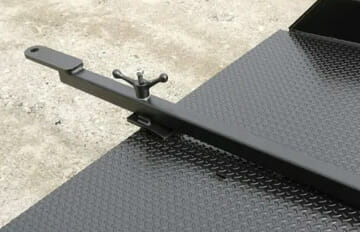
Easier maneuverability with a forklift tow bar.
A tow bar is an option on both steel and aluminum mobile yard ramps that attaches to the lower end of the loading ramp. It allows the ramp to be towed a short distance (within your facility). A towable yard ramp can be maneuvered easily with a forklift. The max towing speed is 5-mph and is not intended for over-the-road towing.
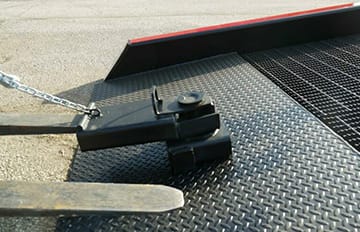
Speed up alignment with the trailer with the 180 degree positioning sleeve.
The position sleeve allows the yard ramp to maneuver 180 degrees which reduces loading/unloading time and increases productivity. The fork slides into the positioning sleeve and the ramp can easily be positioned into place. The positioning sleeve is included with all steel mobile yard ramps. The sleeve is not intended for long-distance towing.
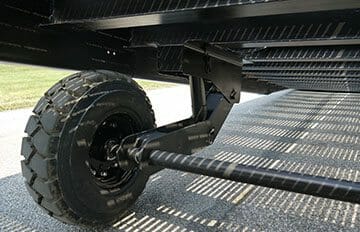
18″ solid pneumatic tires eliminate the maintenance of traditional tires.
The solid/pneumatic tires are standard on all steel Copperloy mobile yard ramps and are ideal for all applications. The tires are maintenance-free.

Shorter end plate to reach high traction grating quicker.
We designed an end plate that is shorter than the wheelbase of most forklift trucks. This way, front-drive wheels can reach high-traction grating, while rear wheels are still on the ground. The plate comes standard with beveling from the underside and helps to provide an easy and smooth ground-level entry. It also eliminates jolts and bumps as the forklifts travel on and off the yard ramp, with or without a load.
Copperloy’s portable mobile dock ramp facilitates effortless right-angle turns for lift trucks and can support capacities of up to 30,000 pounds. Constructed with side plates crafted from A572-50 steel, they offer enhanced durability. When it comes to premium, enduring, and adaptable portable loading docks, Copperloy stands as the ultimate solution.
- Combine two or more portable loading dock ramps to create expanded portable loading dock configurations with secure locking mechanisms.
- Each portable loading dock features standard components such as steel tread plate decking, steel legs, two movable curb sections, and lift sleeves, ensuring safe and convenient handling by fork trucks.
- Edge-of-dock levelers can be seamlessly installed on any side of the platform, ensuring compatibility with existing equipment, vehicles, or installations for enhanced functionality.
- Steel grating bars, designed with optimal spacing, eliminate the need for maintenance and allow for efficient drainage of debris and water, preventing accumulation on the surface.
Mobile Yard Ramp For Sale
Looking for a mobile yard ramp for sale to streamline your loading and unloading processes? Attain the flexibility to create a temporary bridge between ground level and your loading dock or vehicle, making them ideal for facilities that handle heavy equipment or frequent material shipments.
We’ve Got the Right Ramp for Your Loading Dock
Our portable yard ramp is perfect for loading and unloading trucks in locations without loading dock space. Additionally, our dock-to-ground yard ramp (stationary forklift ramps) provides easy access from the ground to the loading dock.
Choosing to rent a yard ramp is a smart solution for short-term projects. Maintain high productivity and save money by renting certified ramps today.
Our portable yard ramp is an excellent solution for loading and unloading trucks when loading dock space is unavailable. Additionally, our dock-to-ground yard ramp (stationary forklift ramps) facilitates seamless access from the ground level to the loading dock.
Our mobile forklift ramps enhance your production efficiency with capacities ranging from 16,000 to 20,000 pounds. Let us assist you in finding the ideal ramp for your needs.
Portable dock boards are engineered to ensure safe loading and unloading for heavy-duty applications using forklifts or other powered handling equipment. Copperloy provides both aluminum and steel dock board options.
Our high-strength aluminum construction is suitable for both regular and heavy-duty applications. Standard capacities range from 900 to 4,000 pounds, while split or twin lock ramps can handle capacities up to 7,500 pounds.
Portable Loading Docks, Portable Loading Dock Ramp & Platforms FAQs
Ramp (SDG) Installation
Congratulations! You have purchased a new Steel Yard Ramp for your company. Like any piece of equipment or machinery, this Steel Yard Ramp will help you tremendously, but it also needs to be operated and maintained properly to achieve maximum benefits. Here are some important tips and tricks to get the most out of your new Steel Yard Ramp while also maintaining maximum safety for your workers.
Steel Yard Ramp Dos and Don’ts
Do traverse the ramp with the forks towards the dock or the elevated end.
Do not:
- Exceed 5 mph when driving on the ramp.
- Exceed the rated capacity of the ramp.
- Travel on the ramp unless it is securely connected to the dock or the carrier floor. Make sure there is 4” of overlap onto the doc or carrier floor.
- Use the ramp without safety chains.
- Use the ramp when people, equipment, or material are in front of the ramp or the lip.
- Use the ramp if it looks damaged – tell your supervisor immediately if it looks like the ramp has sustained damage.
- Keep going if you have questions. It is much better to stop and take the time to ask your supervisor.
- Attempt to lift or lower the ramp lip in any way that is not described in our manual.
- Make sure all body parts are kept clear of the ramp at all times.
Your Responsibilities as Steel Yard Ramp Owner
Copperloy does its best to manufacture the best possible yard ramps, and we ensure their strength and safety when we are ready to deliver them. From the point the yard ramp reaches your plant, it is up to you to make sure the ramp continues to perform at capacity.
• It is up to you to make sure all of your employees are trained adequately. While our Steel Yard Ramps are amazing tools, there is danger in any dock loading/unloading situation. The more knowledgeable your employees are, the safer everyone will be.
• Make sure everything is labeled correctly and that manuals are easily accessible to all personnel.
• We create a maintenance schedule for our Steel Yard Ramps just like car manufacturers create maintenance schedules for their vehicles. The closer you follow that schedule, the more performance you will get out of the yard ramp.
• Do not try to save money or time by continuing to use a damaged Steel Yard Ramp. In the end, you will only be creating a potentially unsafe or disruptive situation. It is much better to take a pause and get your yard ramp back into working order.
• Along similar lines, do not get creative with how you use the yard ramp. Modifications are not advisable, especially if you are trying to create a workaround where a problem exists.
• Copperloy sets specific standards for the vertical lifting range and the horizontal lifting range. Make sure, as the owner, that these standards are not exceeded.
• Talk to us about what your plans are for your Steel Yard Ramp before purchasing. In particular, let us know the applications you are planning for your yard ramp, the types of equipment that will be traveling on the yard ramp, and more. We will be able to customize a solution for you so that your workers and all loads being picked up or delivered will remain safe.
How to Unload a Flatbed Trailer
There are six easy steps involved in safely unloading a flatbed trailer. You can see more details about the six steps, along with drawings and diagrams, in our full manual.
Step 1: Wait for the carrier to come to a complete stop. Once the brakes are set, you can remove the hold-down straps and release the ramp chains.
Step 2: Now position the lift trucks on both sides of the ramp, spreading the forks as widely as you can. The truck must have sufficient capacity to lift the ramp at a distance near the fork end. You can look at the shipper’s B/L to see what the actual weight of your ramp is.
Step 3: Slowly move the lift trucks forward. Be careful that not more than 9” of the fork tip is engaging with the ramp side girder.
Step 4: Take your time and lift the ramp until it has cleared all supports as well as the carrier.
Step 5: The carrier can now pull forward and get completely clear of the ramp. Once this has happened, the ramp can slowly be moved to the ground.
Step 6: Verify your hydraulic system is working. Refer to our full manual for details. Be careful about this step. Some ramps have a plug in the breather location on the pump. If this plug is not changed out, the hydraulic system can be damaged by back pressure. The pressure in the tank can even harm personnel.
How to Unload a Box Trailer
Unloading a box trailer is quite different from unloading a flatbed trailer. Do not make assumptions about the proper steps. Check our full manual for details!
Step 1: Remove all of the straps and verify the pump is in the open position.
Step 2: Now it’s time to insert the positioning sleeve into the ramp and attach the fork truck to that positioning sleeve. Please reference our manual for full instructions on how to do this.
Step 3: Using the fork truck, raise the ramp until it is high enough to clear the container floor. Once you have accomplished that, it’s time to slowly back the ramp out until the wheels of the yard ramp are even with the back of the truck. Make sure the driver backs out in an entirely straight line while doing this. Before beginning this process, make sure the numbers are right for the fork truck to be able to lift the yard ramp safely. Missing this vital step can result in damage to the load or injury to personnel.
Step 4: Now that the ramp is backed out, the wheels should be blocked in place.
Step 5: When you are sure the fork truck is attached securely to the positioning sleeve, raise the ramp until the side rails are parallel to the ground. If you have two fork trucks available, go ahead and skip to step 7. If you have three fork trucks available, take a look at the next step.
Step 6: While one fork truck is holding the positioning sleeve, the other two should be on each side of the ramp, centered to the ramp and under the side rails. Make adjustments until the ramp can be lifted with the weight centered on the fork trucks. Keep lifting the ramp until the wheels are clear of the truck floor, and then move ahead to step 11.
Step 7: If you only have two fork trucks, you need to pay attention to this step. First, you need to block up the back side of the ramp where the fork truck and the positioning sleeve are connected. Again, you need to make sure that whatever you use to block up the ramp is strong enough to handle the ramp’s full weight. Before removing the fork truck, verify that the blocking is secure and steady. This is for everyone’s safety as well as for the safety of the load.
Step 8: Now you can remove the fork truck from the positioning sleeve.
Step 9: With the fork truck disconnected from the positioning sleeve, you now have two fork trucks available. They can be positioned at the center of the ramp under the side rails. Keep adjusting the ramp until it is centered on the fork trucks. The ramp should be lifted until the wheels clear the truck floor.
Step 10: The blocking can now be removed.
Step 11: Now, everyone is caught up to the same step regardless of how many fork trucks you have available. The truck should pull forward slowly until the ramp clears the truck. Then the ramp can be slowly lowered to the ground. Take special note of the pump reservoir. For moving purposes, this reservoir is covered with a plug, but in order to prevent leakage, this must be covered with a vent cap when in use. Be careful when you take this step, and be sure to reference our full manual. Please note that if you do not take this very important step, back pressure can build in the tank, which can damage the ramp or cause injuries to workers.
Step 12: Verify that the hydraulic system is working properly. Please reference the OPERATION section of our full manual for instructions on how to do this safely and correctly. If you see any issues, please contact us immediately. In order to fully test the hydraulic system, we recommend you raise and lower the ramp a few times so that all of the air is squeezed out of the hydraulic system.
Step 13: Phew. It’s finally time to use your new Steel Yard Ramp. Make sure you inspect it one more time before beginning usage. Remember, if it is damaged, please contact us immediately. Do not use a damaged steel yard ramp.
Installing the Dock to Ground Ramp
Our full manual is an extremely important reference when installing a dock-to-ground ramp. Make sure you reference the manual and be sure you understand it fully before installing or operating. Please contact your supervisor or us with any questions you have. We are going to summarize the four steps you need to take to complete this process, but it is important to use the manual because the additional drawings and diagrams will assist in the job.
Step 1: Make sure the site is fully prepared before you install the ramp. This may entail pouring concrete for a footer or apron, depending on your local codes and conditions. Needless to say, you want to make sure the concrete has 100% cured before installing the ramp.
Step 2: Install the Safety Chain Brackets:
Our manual illustrates how to locate the safety chain brackets. You can use the bracket to locate the mounting hole locations. You will use the ½” diameter anchor bolts (not included) to secure the safety chain brackets to the dock wall. Please note, all anchor bolt lengths need to suit local codes and conditions. This will be determined by the type and depth of the concrete. If the anchor bolts are not the correct size, the safety chain brackets can fail, which will cause disastrous results.
Step 3: Placing Ramp:
Now it’s time to place the ramp. Make sure you square up the ramp on the doc’s surface and keep the bumper plates as close to the dock face as you can. This will help prevent the ramp from moving while in operation. Please reference our full manual for illustrations of what this setup is supposed to look like.
Step 4: Attach the Safety Chains
You will see that we have supplied 9/16” bolts, washers, and nuts. These are used for attaching the ramp. The other end of the chain that is not attached to the ramp will slide through the burnout in the chain bracket that is shaped like a plus sign. While you are holding the bracket against the wall, you want to adjust the chain so it has as little slack as possible. The tighter the chain, the more likely you will be to have your ramp pull away from the face of the doc.
Operating the Mobile Ramp
Please make sure our full manual is fully accessible to everyone who will be working with your steel yard ramp. This is just a summary, but there is much more detailed information in our manual.
Step 1: Elevate
When you are ready to elevate your ramp, you first need to be sure you close the pump release valve by turning your lever clockwise. You should not need to force this valve. If you are having trouble moving it, please contact a supervisor. The pump is on the side of the ramp. Use caution. Overturning can damage the valve seat. Now you take the pump handle from its storage bracket and place it into the opening on the pump. You’ll need to raise and lower this handle to get the pump started. It may take a few minutes until you are feeling the full pressure in the handle. Be very careful to remember to pick up the handle and not leave it in the pumping position. Personnel can get injured or loads can get damaged if this step is forgotten.
Step 2: Position
Move the ramp until the lip apron is completely covering the carrier floor and until the stop plates are flush against the carrier door sill. Always position the ramp to the trailer – do NOT try to back the trailers up against the ramp. Slowly open the pump release valve by turning counter-clockwise. As you do this, the ramp will slowly settle onto the carrier floor.
Please make sure the release valve is left in the open position as you get ready to use your Mobile Container Ramp. If you do not serious injuries or damage can occur.
Our ramps are manufactured so that the underside and the hydraulics can float freely, and nothing of weight is laid upon the running gear. The ramp is like a span bridge, and it is only supported at the ends. Our manual section on the positioning sleeve offers more detail on this topic.
Step 3: Secure
You will see this word a lot in any of our operation manuals. Securing a steel yard ramp or a mobile container ramp is one of the most important facets of installation and operation. To secure your mobile ramp, loop the two safety chains we supply around the carrier frame and lock them into place with grab hooks. Try to allow as little slack as possible. Please note: if the chains are missing or damaged or if you can’t, for some reason, connect the chains securely, do not use the ramp. If you are feeling like the ramp is not 100% secure with the chains in use, feel free to chock the carrier wheels and/or use support jacks under the trailer. As always, follow OSHA requirements in this process. Whatever you do, remember the most important thing is to make sure the ramp and the carrier do not separate during operation.
If you are going to be using the ramp at a loading dock or another fixed platform, make sure that the platform has hooks or eye devices that are totally secured so that they can hold the container ramp chains.
Step 4: Operation
Again, we want to reiterate how important it is to make sure the pump release valve is OPEN before operation begins. That is always step 1, even though we are talking about step 4.
Now, approach the ramp in low gear and maintain an even rate of climbing speed. Please see our full manual for detailed diagrams and illustrations. Always be sure the fork truck is pointed with the forks toward the carrier end, and when ascending or descending, the truck should be in the lowest gear. Make sure the fork truck driver understands this before beginning operation.
As always, be sure to follow all lift truck safety and operation standards of ASME/ANSI B56.1-1993 and any new addenda. Once the fork truck is moving on the ramp, do not stop, start, or change speeds. This can cause damage or serious injuries.
Step 5: Loading/Unloading Completion
When loading or unloading is complete, the first step is to make sure the lift truck is off and completely clear from the ramp. All safety chains can be unhooked once the truck is off, and the ramp can be disconnected from the carrier. Now close the pump release valve by turning it clockwise. Remember, you should not need to exert a lot of strength to do this. If it is not working easily, ask your supervisor for assistance. Overturning can cause damage or injury.
Slide the pump handle into the pump handle adapter and pump a few times to get the ramp a few inches above the carrier floor. Once this is done, the carrier can pull away or, using the positioning sleeve, it can move the ramp to the next location. Once the ramp starts moving, or once the carrier pulls away, all personnel and objects must be moved out of the way.
Please reference our full manual for more detailed information on the positioning sleeve and the towbar. Remember, this manual should be easily accessible to all personnel!
Make sure you do not let the carrier pull away with the ramp just falling to the ground. Although a steel yard ramp is a sturdy piece of equipment, this kind of activity is a great way to damage the ramp or cause injury to workers.
Step 6: Lowering the Ramp
We want to reiterate that when raising or lowering your yard ramp or mobile ramp, all personnel and objects should be well clear of the area. To lower the ramp, slowly open the release valve by turning the knob counter-clockwise. Leave the valve in this open position.
When you are not using your ramp, it should be stored in the lower position to avoid injury the next time it is needed. When the ramp is in the lowered position, do not take shortcuts by trying to raise it with your hands. All body parts should always be clear of the space between the ground and the ramp or towbar.
Step 7: Towing (Towbar)
Copperloy makes available an optional towbar accessory. Our manual fully details how to connect this towbar to the ramp.
Step 8: Positioning Sleeve
We highly encourage you to reference the full manual so that you can see all diagrams and illustrations, which help illustrate the points here.
When positioning the ramp, never exceed 2 mph. If you try to travel at higher speeds, the positioning sleeve could be damaged, which can cause many other serious problems. Whenever the ramp is supported by the positioning sleeve, all hands, feet, or any other body parts should be well clear. Before starting the process of using the positioning sleeve, make sure it is not damaged in any way. A positioning sleeve will be supplied with all of our steel frame amps.
Please make sure your team understands the difference between the towbar and the positioning sleeve. The positioning sleeve is only for positioning and traveling for very short distances. The positioning sleeve should not be rotated past 90º from the center.
Believe it or not, our positioning sleeves can be used for up to several hundred yards. Talk to us before you purchase your yard ramp so we can ensure everything we provide will meet your application needs.
Maintenance
The better you do at maintaining your yard ramp, the better it will work for you, and the longer it will last. Our full manual outlines detailed instructions for how to properly maintain your Copperloy steel yard ramp. Here are some highlights.
Blocking
Most of the maintenance a ramp needs will be on the underside. For everyone’s safety, make sure the ramp is securely blocked before anyone situates to work on the ramp. For maintenance work, the support should be placed under the lip apron end. For these purposes, load-bearing structures like loading docks are best. Avoid using lumber or steel members. The locking chains we supply should also be used to hold the ramp secure through maintenance. As always, make sure all objects are clear. Be especially cautious around the hydraulic system.
Along with securing the ramp 100%, make sure the hydraulic system is open and all the pressure has been relieved. Do this before breaking any connections or removing any hoses. Otherwise, damage or injury can occur.
Maintenance Checklist
The following items should be seen regularly.
Hydraulic Hand Pump/Reservoir
We fill up the hydraulic system and fill the vent with a shipping plug. As has been mentioned before, it is very important to replace this plug with the vent cap before you start using the ramp.
Filling Tank
There are a few different steps involved in filling the tank. First, make sure the ramp is in the fully lowered position. Next, remove the vent cap from the pump reservoir. Our full manual offers more details on how to complete this process. Be sure you clean away any dirt or grime so that the fluid in the reservoir has no chance to get contaminated. Contamination in the hydraulic system is one of the leading causes of malfunction in a mobile yard ramp.
Once the tank is cleaned up, use a funnel to fill the tank through the vent cap hole. The oil should be up to a half inch to an inch from the top. You should use a hydraulic oil 46 weight or something very comparable. Make sure what you are using IS hydraulic oil. Any other kind of oil will void your warranty. We use Citgo AW-46 when we first fill the fuel tank before shipping.
Make sure you do not allow the ramp to raise at all when you are working on the hydraulic system.
Line Bleeding
It is important to make sure there is no excess air in your hydraulic system. Normally, just lowering and raising the ramp a few times is enough to work out any extra air bubbles, but if you still feel like there is too much air in the system, you will need to bleed the system of entrapped air. It sounds scary, but it’s just a few simple steps.
First, make sure the pump is at its fully lowered position. Then, loosen the hose fitting at the cylinder. Make sure the release valve is CLOSED. Slowly operate the pump until the oil flows without any sign of air bubbles. Now, remember to tighten the hose fitting and add more oil so your tank is back to the proper level of fullness.
Removing the Hydraulic Cylinder
Before removing your hydraulic cylinder, you will need to elevate the lip end of the ramp and reference our blocking instructions outlined in the full manual. First and foremost, if the ramp is not in the lowest position, use the release valve to lower it onto the support. Once the ramp is fully blocked and secure, disconnect the hose from the cylinder. You can also release the cylinder retainer pins and spacers at this time.
Now it’s time to put in your new cylinder. First, pull out the rod. If you have trouble with this step, the thing to do is to make sure the hydraulic port is open and clear. If you are still having difficulties, it is time to ask your supervisor for help. Place the cylinder in position, and although it should be obvious, make sure the top is at the top. You can now put back the pins and spacers. Replace the hydraulic line, but do not tighten the fitting just yet. First, with the release valve still in that open position, use the fork truck to raise the lip end of the ramp so it is clear of the support. Remove the support out of the way so you can now lower the ramp to its slowest possible position. Reference the previous section on how to bleed the hydraulic system to make sure you aren’t trapping any extra air in the system, tighten the hose fittings, and add the oil till you are at the optimum oil levels.
Removing the Hydraulic Pump
Once again, the ramp needs to be completely lowered before you start this process. Once the ramp is positioned properly, disconnect the hose from the pump. You’ll see four hex nuts at the back of the pump reservoir – remove those, and you will be removing the pump from the side of the ramp. To replace the pump, just retighten the four hex nuts and make sure the pump is securely connected to the side of the ramp. Bleed the hydraulic lines and add oil as needed.
Replacing the Grating
Be very careful not to damage the crossmember during this process, because a damaged crossmember means the structural integrity of the ramp is compromised. Our full manual offers more detailed descriptions along with diagrams and illustrations.
You should not need to remove the entire piece of grating. We have manufactured the grating so that smaller lengths can be replaced. Make sure you cut the grating at the center of the crossmember, and always keep both ends of the grating supported by the crossmember. Be sure to clean all areas by grinding flush and then inspect to make sure there is no damage.
If you need to install new grating, start by cutting the grating to fit the area you need to replace. Don’t leave more than ¼” clearance on both ends. Place the grating over the crossmembers and make sure the spacing is right. Now, weld two-inch-long welds every other crossmember six times, and make sure the welds are evenly spaced from side to side. Weld the ends as well. The welding should be done from the grating to the top of the crossmember, all the while making sure the grating is kept flat against the crossmember. Once everything is welded into place, touch up all the areas with rust proofing, and you are done!
Removing the Wheels
Please reference the full manual to see detailed instructions on how to perform this task. Before reassembling the wheels, make sure any rust is cleaned away with emery cloth so that any new bearings won’t get damaged.
Whenever you are getting ready to work on the wheel or axle assembly, regardless of the specific part, the ramp should be in the lowest possible position, the release valve must be open, and the ramp should be lifted so that the wheels are slightly off the ground. Please reference our full manual for more detailed instructions and diagrams.
Steel Container Ramp Frame
The steel frame’s enamel finish should be inspected every year. If you find any rust, you need to try to wire brush it away, prime paint, and then add a top coat of paint that is also rust-inhibiting. No matter how well you take care of your steel yard ramp, it will start to rust eventually. With just a little touch-up, it will remain fully functional for many years to come.
Portable Loading Dock Ramp Types
Loading Dock Ramp
Are you and your team considering investing in a robust ramp for your loading dock? Alongside our extensive selection of forklift dock ramps and pre-owned dock ramps, Copperloy by JH Industries takes pride in offering a diverse range of material handling equipment. Reach out to our team to discover more about dock boards, dock plates, edge of dock levelers, loading dock ramps, and more.
Portable Dock Ramp
A portable loading dock ramp from Copperloy by JH Industries can transform any workspace into a freight handling hub.
Not all facilities necessitate a fixed material handling setup. While some facilities regularly handle freight, others do not. If your facility only receives shipments occasionally, a portable dock ramp could be the ideal solution for you and your team.
Movable dock ramps offer complete loading dock capabilities where a dock is absent. These units grant full ground-level access to buildings, railcars, and trucks. Our extensive selection of portable dock ramps includes both steel and aluminum models, accommodating loads of up to 30,000 pounds.
Forklift Dock Platform
For a sturdy, reliable, and portable forklift ramp or other loading equipment, turn to Copperloy. Our heavy-duty forklift loading ramps enable you to maintain peak levels of efficiency and productivity in your freight loading operations. Moreover, a Copperloy forklift ramp ensures safer operation compared to other dock ramps on the market.
Benefiting from over 70 years of manufacturing experience, an expert engineering team, and a state-of-the-art manufacturing facility, Copperloy leads the way in ramp design and production, guaranteeing our customers always receive top-tier equipment.
Truck Dock Ramp
In need of truck dock ramps? Ensure your workspace remains safe through consistent maintenance, and reach out to Copperloy by JH Industries today.
Is your current material handling setup falling short? Copperloy by JH Industries’ temporary loading dock ramps offer unparalleled stability and efficiency. Notably, a Copperloy truck ramp boasts a convenient pump, durable solid-filled pneumatic tires, and a centrally located cylinder.
Copperloy loading dock truck ramps excel in ease of operation, rapid raise times, and outstanding durability. Provide safe, efficient, and productive ground-level access to semi-trucks with a ramp from Copperloy by JH Industries.
Steel Dock Ramp
Require durable steel dock ramps for your facility? Copperloy by JH Industries has the solutions you need.
Are you and your team planning to enhance your facility’s existing material handling setup? Optimize safety, profitability, and efficiency with Copperloy steel dock ramps. Our loading dock solutions offer stable and robust alternatives to competing ramps.
To maintain optimal efficiency in your workspace, safety must always be paramount. At Copperloy by JH Industries, safety takes precedence above all else. Steel dock ramps and other Copperloy installations feature an exclusive array of standard safety features.
Warehouse Loading Dock Ramp
Searching for new loading dock equipment for your warehouse? Consider Copperloy’s Warehouse Loading Dock Ramp. As a leading developer of heavy-duty loading ramps and other loading dock equipment, Copperloy delivers warehouse loading dock ramps that optimize efficiency and productivity while also maintaining the highest safety standards in the industry.
Furthermore, our warehouse ramps offer excellent mobility, allowing you to move them from job to job and load freight with forklifts anywhere in your facility.
The Copperloy portable dock ramps significantly enhance productivity, elevate safety standards, and optimize space utilization. Drawing upon sixty years of industry expertise, we pride ourselves on manufacturing America’s premier portable loading docks. Our innovative one-cylinder ramp design applies substantially less pressure compared to other ramps available in the market.
In addition to our exceptional loading docks, we also produce high-quality mobile yard ramps designed for ease of use and maneuverability. The Copperloy mobile ramp boasts durability, longevity, and user-friendly features that streamline lowering and raising operations to meet your specific requirements. As proud manufacturers of quality dock ramps, mobile yard ramps, and more, we strive to exceed expectations.
So why choose Copperloy portable dock ramps? Here are some compelling reasons:
- Enhanced operational ease: The external location of the hydraulic pump ensures convenient access, simplifying operation.
- Swift raise times: Copperloy portable dock ramps elevate two and a half times faster than competing models, enhancing efficiency.
- Reduced wear and tear: Rotation focuses on our ramp’s position sleeve rather than the ramp’s connection, minimizing overall wear and tear.
- Heightened stability: Our ramps boast superior stability, with the centrally-located cylinder significantly reducing the likelihood of tipping incidents.
How Do You Load a Truck Without a Dock?
Performing ground-level loading, also known as loading without a dock, is a necessary task when traditional loading facilities are unavailable, typically encountered in outdoor environments, smaller warehouses, or when handling smaller delivery vehicles. To execute this process effectively, a systematic approach is crucial.
- Preparation of the Loading Area: Begin by clearing the ground-level loading area of any obstacles or debris that could impede the process. It’s essential to ensure a stable and level surface to provide a safe foundation for both the material handling equipment and the goods to be loaded.
- Selecting Suitable Material Handling Equipment: Choose the appropriate equipment based on factors such as the type and weight of the goods. Common options include forklifts, pallet jacks, or hand trucks. In some instances, a portable loading ramp can simplify the process significantly.
- Truck Positioning: Position the truck securely in a location that allows easy access to the loading area. Ensure the truck is properly braked and positioned stably to prevent unintended movement during loading.
- Utilizing Loading Ramps: Employ loading ramps, if available, to bridge the height gap between the ground and the truck bed. Ensure the ramp is sturdy, non-slip, and capable of supporting the intended load.
- Securing the Ramp and Truck: Verify that the loading ramp is securely positioned and aligned with the truck’s cargo area. Wheel chocks can be used to prevent truck movement during loading.
- Loading Procedure: Employ material handling equipment to load goods onto the truck, ensuring even weight distribution for balance and stability. Secure the goods with straps, load bars, or suitable restraints to prevent shifting during transit.
- Batch Loading for Significant Volume: Consider unloading and loading goods in batches to maintain balance, prevent overloading, and ensure safety.
- Adhering to Safety Protocols: Strictly adhere to safety procedures throughout the loading process. Workers should be well-trained in proper material handling techniques to prevent accidents and injuries.
- Exiting and Securing the Truck: After loading, safely exit the truck and ensure all doors are properly closed and secured to prevent cargo shifts during transit.
- Final Checks Before Departure: Before departure, double-check the load’s weight distribution and security to ensure safe transportation and minimize risks during transit.
Though ground-level loading demands extra effort and attention compared to dock loading, following these steps and prioritizing safety guidelines ensures efficient and secure operations.
Determining the optimal size of a loading dock is not a one-size-fits-all endeavor; rather, it hinges on tailoring the design to align with the distinct demands of the facility and its operations. However, several factors can guide the determination of the appropriate dimensions:
- Loading Bay Quantity: The size of the loading dock often correlates with the number of loading bays necessary to handle incoming and outgoing goods efficiently. More bays required equate to a larger loading dock area.
- Dock Width: Ensuring sufficient width allows for the safe maneuvering of material handling equipment, like forklifts, and provides ample space for loading and unloading tasks. While a standard width typically ranges from 10 to 12 feet, broader dimensions may be warranted for larger-scale operations.
- Clearance Space: Adequate clearance around the loading dock is vital for maneuvering vehicles and equipment safely, promoting smooth operations.
- Buffer Zones: Dedicated buffer areas, or staging areas, are crucial for organizing goods before loading or unloading from trucks. Tailoring the size of these areas depends on the volume and characteristics of the goods being handled.
- Dock Equipment: Allow sufficient space for dock levelers, bumpers, and other essential equipment integral to the loading and unloading processes, ensuring unimpeded flow of goods and equipment.
- Building Layout: Consider the overall footprint and available space within the building or facility when designing the loading dock area.
- Traffic Flow: Efficient movement of trucks, equipment, and personnel within and around the loading dock area should be factored into the design.
- Safety Compliance: Adhering to local safety and building codes specifying minimum requirements for loading dock size and clearance areas is paramount.
- Future Expansion: Anticipate potential growth and expansion of operations, ensuring that the loading dock design accommodates increased demands and allows for the addition of more loading bays if needed.
Collaborating with architects, engineers, and logistics specialists is essential in crafting a loading dock that precisely addresses the facility’s unique needs. Prioritizing safety, efficiency, and flexibility in the design fosters seamless operations and adaptability to evolving requirements.
Loading docks typically adhere to standardized heights to ensure compatibility with most vehicles. In regions like the United States, the common standard height is approximately 48 inches (4 feet) above ground level, known as “dock height.” This standardization facilitates efficient loading and unloading processes, as it aligns with the typical height of truck beds, usually ranging from 48 to 52 inches.
Maintaining a consistent dock height of 48 inches enables seamless transitions between the loading dock and the truck or trailer. This uniformity streamlines operations, allowing forklifts and other handling equipment to move directly between the dock and the vehicle without the need for excessive lifting or lowering.
While 48 inches serves as a prevalent standard, variations may exist, especially in facilities with non-standard dock heights or older buildings predating widespread standardization. In such instances, customized loading solutions or dock levelers can be employed to bridge height disparities, ensuring compatibility with specific vehicle heights.
In the absence of a conventional loading dock, various alternative methods and equipment can facilitate the loading and unloading of goods from trucks, trailers, or containers. These alternatives prove particularly beneficial for small enterprises, outdoor environments, or sites lacking dedicated loading facilities. Below are some viable options to explore:
Ground-Level Loading Ramps:
Portable loading ramps, also referred to as yard ramps, serve to bridge the height disparity between the ground and the truck bed. Adjustable in height, these ramps offer a sloped surface, enabling forklifts to smoothly transport goods in and out of the truck.
Surface Mount Dock Lift:
Surface mount dock lifts can be installed on any level surface capable of supporting the lift base without deformation, eliminating the need for a pit. They effectively transform any suitable surface into a functional loading dock.
When considering an alternative to a conventional loading dock, factors such as the volume of goods, the type of equipment or vehicles employed, load weights, and the frequency of loading and unloading activities should be taken into account. Ultimately, the choice will hinge on specific operational requirements and budgetary considerations.
Securing the load is crucial for safe transportation. Utilize straps, load bars, or other restraints to prevent goods from shifting during transit, safeguarding both the cargo and the driver.
Maximize space utilization by stacking items vertically and utilizing the full height of the truck. This efficient use of space optimizes capacity and minimizes wasted cargo space.
Throughout the loading process, prioritize safety. Ensure all workers are trained in proper material handling techniques and equipped with necessary safety gear to prevent accidents and injuries.
In summary, loading a truck effectively involves careful planning, attention to weight distribution, securing the load, efficient space utilization, and a strong emphasis on safety. Following these steps ensures goods are loaded in a manner that promotes safe and efficient transportation to their destination.
Portable Loading Docks Categories
Speed Up Loading & Unloading With Yard Ramps
Why You Should Choose Yard Ramps Over Permanent Concrete Dock Ramps
advandesign2025-05-29T12:08:01-04:00May 28, 2025|Yard Ramps News, Loading Dock Equipment News|
Understanding Loading Bays and Loading Docks
advandesign2025-04-17T13:04:19-04:00January 3, 2025|Loading Dock Equipment News|
Aluminum Ramps vs. Fiberglass Ramps for the Moving Industry: Which to Choose
advandesign2025-08-05T04:38:53-04:00December 10, 2024|Aluminum Ramps News, Loading Dock Equipment News|


