American Made Yard Ramps
Engineered for the Highest Speed & Forklift Safety with 10 Unique Features


8-Foot Level Off
The 8-foot level-off ensures forklifts can safely and easily enter and exit trailers, loading docks, and platforms without stopping. It stabilizes the ramp, especially for mobile ramps.
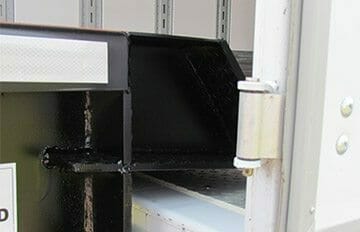
15-Inch Lip
The 15-inch lip securely rests on the truck or platform, with eight-foot safety chains preventing the ramp from detaching.

Hydraulic Pump
The single-acting hydraulic hand pump raises the ramp with minimal effort, and is protected from dirt and damage for easier maintenance.
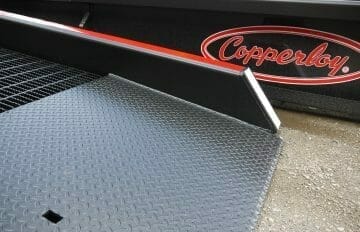
Safety Curbs
7-inch high curbs prevent accidental runoff, with a patented box frame design for added stability.

Smooth Side Plates
Smooth side plates and safety curbs protect working components and are made from high-strength steel for durability.

Low End Plate
The shorter end plate allows forklift front wheels to reach high-traction grating while keeping the rear wheels grounded for smooth entry and exit.
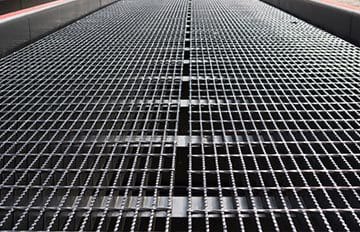
Deck Grating
High-strength steel grating ensures durability and traction in all weather conditions, with debris falling through the 1-3/4 inch bars.
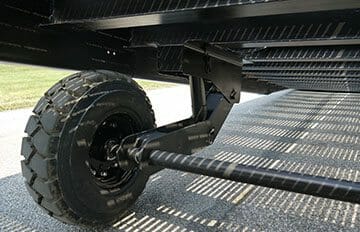
18-Inch Solid/Pneumatic Tires
Solid/pneumatic tires are maintenance-free, eliminating the need for air.
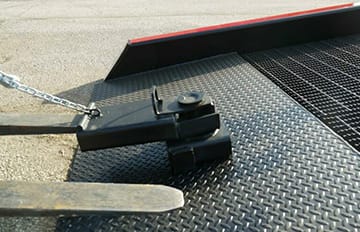
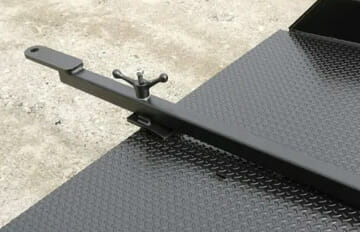
Positioning Sleeve
The 180-degree positioning sleeve allows for quick ramp alignment, reducing loading/unloading time and boosting productivity.

Tow Bar
An optional tow bar lets you move the ramp short distances within your facility using a forklift, with a maximum towing speed of 5 mph.
Load/Unload Faster and Safer with a Copperloy Portable Yard Ramp
The steel yard ramp from Copperloy is designed to operate faster and with more safety features than any other forklift yard ramp. With our competitive pricing and short lead times, expanding your shipping capacity with mobile loading dock truck ramps has never been easier.
Unique Features for Speed & Safety:
- Steel or Aluminum I-Beam Construction
- 7” Steel Curbs / 7” Aluminum Curbs
- 36’ in Length
- 8’ Level-Off
- 30” Approach Ramp
- 15” Lip
- 1 ¾” Serrated Steel Grating
- 18” Solid/Pneumatic Tires
- Single-Acting Hydraulic Pump
- Positioning Sleeve (180° rotation)
- Safety Chains
- Tow Bar (optional)
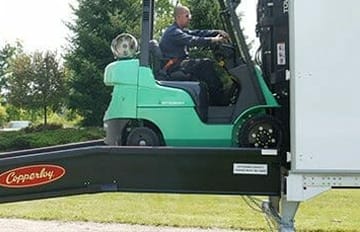
8-Foot Level Off
Ensures forklifts can safely and easily enter trucks and docks, providing a stable and efficient loading experience.
15-Inch Lip
A 15-inch lip and 8-foot safety chains keep the mobile ramp secure to the truck or dock, preventing it from pulling away during use.

Safety Curbs
7-inch curbs and a patented box frame prevent accidental runoff, ensuring safe forklift operation on all Copperloy ramps.
Hydraulic Pump
Allows for a faster and easier lift, while its protected, relocated position keeps it safe from damage and simplifies maintenance.
Smooth Side Plates
Our ramps feature smooth side plates, made of high-strength steel, to enclose and protect all working components from damage.
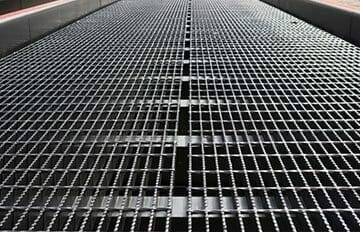
Deck Grating
All-weather, high-traction surface. The 1-3/4 inch bar depth allows debris, rain, & snow to fall through, increasing safety and durability.
Positioning Sleeve
Allows for easy 180-degree maneuvering, reducing alignment time and increasing loading and unloading productivity.
Low End Plate
Quickly achieve a smooth groun-level entry with a forklift. Eliminates jolting, whether the forklift is loaded or empty
18-Inch Solid/Pneumatic Tires
These maintenance-free solid/pneumatic tires don't require air and have lubricated-for-life bearings.
Tow Bar
Enables a forklift to easily tow the ramp short distances within a facility at a maximum speed of 5 mph.
Yard Ramp Details
Our Offerings
Manufactured with pride in the USA, our new yard ramps are built to last using high-strength American steel. Our ramps are engineered in-house and undergo rigorous factory testing to ensure maximum safety, durability, and reliable performance, providing you with the longest possible lifespan of use.
Looking for a flexible, cost-effective solution for your short-term or seasonal needs? Our yard ramp rentals allow you to avoid the long-term commitment of a purchase while also serving as a great way to try out a ramp before you buy.
In need of a budget-friendly yard ramp that doesn’t compromise on quality? Copperloy is the best choice. Our used yard ramps are carefully inspected and reconditioned by our team to ensure they deliver the heavy-duty performance you need.
-
Sale!
 View Details
Capacity: 16,000#
Length: 36'
Width: 70"
Yard Ramp | 70″ Yard Ramps | 16,000lb Capacity

When it’s time for maintenance or repair, we have the yard ramp spare parts you need to keep your equipment running smoothly.

Applications of Yard Ramps
Semi Truck Loading

Streamline your operations and expand your loading capacity by using our yard ramps to load semi-trucks directly from the ground. This method bypasses the need for a permanent loading dock, significantly increasing efficiency and allowing you to utilize any open space for shipping and receiving.
Loading With Forklifts

When using a forklift, safety is paramount. Our yard ramps are engineered with features like high-traction deck grating to prevent slips and 7-inch safety curbs to protect against accidental runoff. Ensure your team and freight are as safe and secure as possible by utilizing our ramps.

Here’s What Our Customers Say
From William M. Petro, President of Century-Fournier Inc.
“I wanted to thank you for coordinating the pick-up, repair, and return to Metalico of the subject yard ramp in less than 24 hours. This enabled Metalico to continue operations with minimal downtime. Their management was very grateful for this turnaround.
We all want to sell our goods, be productive, profitable and be recognized for quality products and services, however, I believe the real test of a company’s fiber is how well it handles problems. JH Industries (Copperloy) has passed that test!
I’m sure there are many personnel that contributed to this successful repair. Please advise them how much we appreciate their contribution.”


